Friday, October 31, 2014

Cloth Diaper 101

CLOTH DIAPER 101
 There are a ton of options out there when it comes to cloth diapers, but here is how we do it in the Rapp house. I hope this info makes it easier for you to make the best decision for your little one. 

I promise you it's not gross or hard or time consuming and you will not be spending every free minute doing laundry. In my experience it's been super easy...and i've become a little obsessed with cloth diapers (as many cloth diapering parents do...).

So you're pregnant and considering cloth diapers?!! CONGRATULATIONS!! 
What you'll have to do before the baby arrives: Buy some diapers. 
What you need to decide is whether you want to do a prefold cloth with a cover OR a more modern diaper like a pocket diaper or all in one. I decided to go exclusively with one-size pocket diapers because the One-Size means they adjust sizing through out your babies diapering years so you don't have to buy a bunch of different size diapers and switch them out as baby grows (like you have to with their clothes). And the Pocket Diaper means you can stuff them as you wish depending on whether your baby is a heavy wetter or not. (**special thanks to Carey Ogden who helped me with this decision when I was pregnant)
Although the pocket diapers say they fit 7-35lbs, I found that they leaked until Owen reached 10lbs, so we were in pre-folds and covers for the first few weeks (as well as some of the disposables they provided at the hospital (definitely shove all those free diapers, wipes, etc into your bag before you leave the hospital!!))

What I purchased while I was pregnant:
-2 six packs of OsoCozy prefolds in size 1
-package of Snappi fasteners (so the prefolds hold in place)
-3 Thirsties newborn diaper covers (with the belly button notch)
-12 Bumgenius 4.0 One-size pocket diapers (some hook and loop some snaps)
-6 Fuzzybunz One size diapers (plus 3 more after Owen was born)
-2 wet bags (you'll need this for your travel diaper bag to transport a soiled diaper back home)
-Ubbi diaper pail
-2 Ubbi pail cloth liners (they get thrown into the laundry along with the diapers)

**you'll have to prep the diapers before they can be used. This means washing them 3-4 times so they become really absorbent. make sure you do that before baby arrives. 
The diapers above are what we are still using. 21 diapers total. I have to do a diaper load of laundry every other day. Add more diapers to your collection if you don't want to do the diaper load as frequently.

Here's what it's like to actually use the diapers:
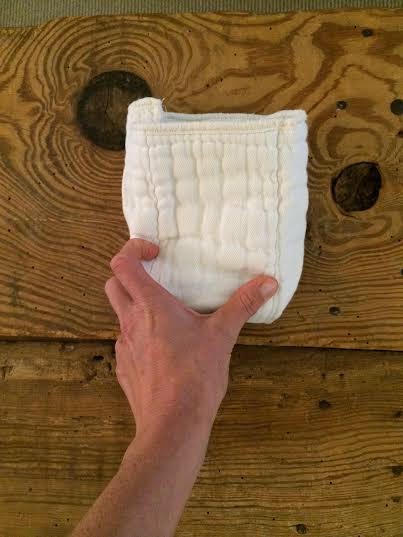
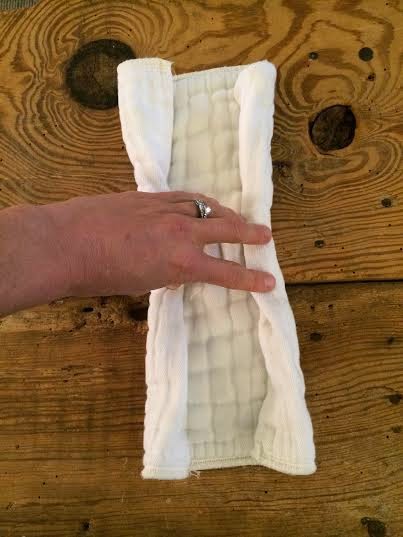
Prefolds with covers: If you use them like I did, you'll only be in these for the first few weeks. If your baby is exclusively breastfed, the poo is entirely water soluble, so you just put the cloth prefold into the laundry (poo can go into washing machine too) and if the cover did not encounter poo, use it again with a fresh prefold. I only washed the covers if they encountered direct poo or if it had been a couple days since washing them. If they are soaked in pee, you can just hang to dry and use it the next diaper change. If your baby is formula fed, the poo will need to go down the toilet or in the trash, and i'll get into that a little more in a second. There are many ways to fold the prefold onto baby. I used the jellyroll. It'll take a couple of times actually using them to know what roll is best for your baby. Practice on a teddy bear before baby arrives!
jelly roll
jelly roll


jellyroll on bear with Snappi (the Thirsties cover goes over all of this)

Pocket Diapers: If your baby is exclusively breastfed, you'll just take the diaper off baby, pull out the insert and drop both into laundry pail. BumGenius diapers come with two inserts: newborn and the main insert. We used only the newborn insert for about a month, then switched to two newborn inserts in one diaper (double stuffing) for about a month and then switched to the main insert. The main insert is longer, thicker, and has snaps so the sizing can adjust as your baby grows, but it was a little bulky for Owen for the first couple months. We have always had to change his diaper every two hours to prevent a leak. Even now, still changing every two hours (he's 14 months old). This is because cloth diapers are...cloth. They are not made out of the nasty super-absorbent stuff that's inside disposable diapers, so they do have a leaking point.

When poops get real, you can't just drop everything in the laundry pail. This is the case for formula fed babies or when your baby starts eating solid foods. When this happened, I purchased Eco Liners. I lay the liner inside the diaper before putting it on Owen. When he has a poop, I just pick up the liner and up comes all the poop with it, and that goes into the trash while the insert and diaper go into the laundry pail. If you don't use liners, you'll have to use a poo-spatula type thing to get the poo out of the diaper or have a water spray hook up on your toilet....or pick the poo out of the diaper with a wipe or something... Liners are fabulous!!
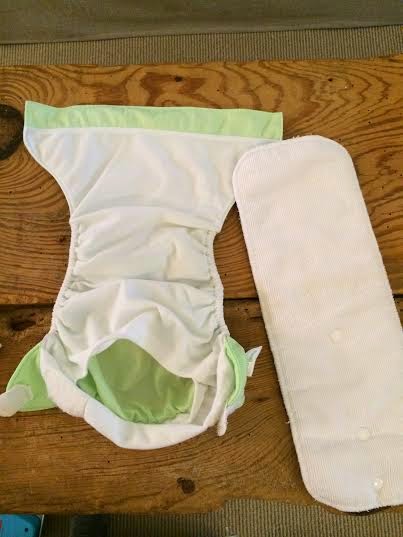
pocket diaper and main insert (un-stuffed)

a roll of liners

Washing the diapers
I have a total of 21 diapers which means I have to wash them every other day. When it's time to wash, I turn the washable diaper liner inside out over the washing machine and throw it all in (liner included). I wash on hot and do a double rinse cycle. I have not needed to soak the diapers before doing the wash cycle like other moms do...perhaps because of the liners?!! My diapers always come out clean! I do use a soap that is made for cloth diapers. I use Rockin' Green detergent. I tried using free and clear All detergent, but the buildup made the diapers less absorbent, and they didn't come out as clean. Every month or so, the diapers will get an ammonia odor to them. When that happens, throw a couple tablespoons of bleach in with the wash load. That'll take care of it. If you are using any velcro diapers (the hook and loop BumGenius), hang those to dry to prolong life, but dry the rest in the dryer without a dryer sheet. Dryer sheets make them less absorbent. Do not dry the pail liner either because it'll get warped/melted (learned that the hard way).

When Owen turned 1, he started wetting more during the night. I was double/triple stuffing his diapers for a while, but sometimes I'd still have to change him around 4am. I started using disposables at night recently. They are nasty but they allow him to sleep through the night a little easier. You'll get to know your child's wetting pattern and make decisions that fit the best.

Hope this helps! Leave me a comment if you have any questions!

Wednesday, October 29, 2014

Peanut Sauce

 PEANUT SAUCE!!
kids will eat anything if you serve it with a little peanut sauce!
...it's the new katsup!
Recipe: 
4 T peanut butter *
*(bonus points for grinding your own or using a brand that doesn't add palm oil)
3T coconut aminos*
*(see note and photo below)
1t minced fresh ginger
1 minced garlic clove
1t sesame oil
1/4 cup water

mix it all together with a wisk! YUM! 

This recipe makes enough for 4-5 servings if mixing with noodles as shown above, or you can just make the sauce and keep it in the fridge as a dip for veggies for a healthy kids snack! I promise you, even their most hated veggies will go down with a smile if smothered in this healthy peanut sauce!

side note (help me): I usually use buckwheat or wheat noodles with this dish.  Rice noodles also work great, but I have the worst luck cooking rice noodles. They always come out too sticky! If you have a tried and true method for cooking rice noodles, let me know in the comments below...I'd love to master them! :)

the peanut sauce and the greens (bok choy and tatsoi stir fried in a little olive oil). try carrots and/or kale too!

Coconut Aminos are a fantastic alternative to soy sauce for kiddos. It contains much much less sodium than soy sauce and it's a little sweeter. delicious !
**Tip: If your kiddos are not too keen on greens (ie: they are telling you no and they don't like it even before giving it a try) go ahead and chop them up and mix it in with the noodles

**health info: this sauce is so wonderful for two reasons. 1.) it's SO YUMMY. and 2.)it's SO GOOD FOR YOU! It's jam packed with protein and contains garlic and ginger: two of the worlds healthiest foods for your cardiovascular and gastrointestinal system as well as antioxidant effects. Eat up!! :-P

Wednesday, October 22, 2014

Always be Roasting

Fall time motto: "Always Be Roasting"

When the air is getting crisp outside and all these wonderful fall veggies are plentiful at the farmers market, keep a constant supply at arms length for your family!  Roasted veggies are not just for dinner. Do one big veggie roasting session each week and keep them in clear containers in your fridge. You'll be able to grab some and add it to any meal or just munch on them straight from the fridge for a healthy snack. 
I have the last of the summer squash from our farmers market and broccoli in right now with sweet potatoes and winter squash on deck!

tip: steaming of course works too, but I've come to find out that my son prefers these fall veggies after they've been roasted in a little olive oil with some garlic. Nothing wrong with adding some healthy fat and extra flavor! 


Thursday, October 2, 2014

Pumpkin Applesauce

PUMPKIN APPLESAUCE

It's that wonderful time of year when you can get out as a family and pick pumpkins and apples!! This is a super simple recipe that you and your kids will LOVE. You can make a big batch and freeze enough for the whole year!

Tidbit on applesauce: I will never understand why you would ever add sugar to applesauce!! Apples have enough of their own sugar to make any recipe deliciously sweet!!

RECIPE
you will need:
(this is a double batch so you'll have plenty to freeze!)

10-12 apples (whatever kind was ripe for the picking)
2t cinnamon
about 3 cups pumpkin puree (or 1 large can pumpkin)
1.5 cups water

Peel and dice the apples. Add all ingredients into a deep pot and bring to a boil, then simmer about 20 min until apples are soft. Move ingredients to blender and blend to desired consistency. You're done! YUM!!

To turn a real baking pumpkin into pumpkin puree:
Preheat oven to 400*
slice pumpkin in half and remove stem and inner guts.
rub with a little olive oil and lay cut side down on baking pan.
roast for about 40 min until soft. 
scoop out the flesh and blend until smooth.

NUTRITIONAL INFORMATION: Pumpkins are a mega source of vitamin A which boosts your immune system, as well as keeps your eyes, bones and teeth healthy. Pumpkins also provide us with iron, vitamin C and fiber. And oh how I love apples!! Remember the old saying, "An apple a day keeps the doctor away"? well that's because of the vitamin C, but also apples are rich in a variety of phytonutrients, including vitamins A and E and beta carotene!

Monday, September 22, 2014

Sweet Potato Balls

SWEET POTATO BALLS
(a fun finger food for kiddos that's packed with nutrients!)

Recipe:
1 sweet potato (steamed or roasted until mushy-soft)
1 cup cooked lentils
1/2 cup cooked quinoa
1T nutritional yeast (optional)

mix the ingredients together and roll into little balls!


**shocking tip: babies love lentils!! (ok...I can't speak for all babies, but I have been taking my own mini poll and most give a chubby little thumbs up!) 

to cook lentils: add 1 cup lentils and two cups veggie broth to a pot. put the lid on, bring to a boil, then reduce heat to simmer for about 20 min. use a very low sodium broth...or make your own.
to make veggie broth: add 8 cups water, 1 bay leaf, 1T thyme, 1T parsley, 1 garlic clove (chopped), 1 onion (chopped), 2 carrots (chopped), 2 celery stalks (chopped). bring to a boil then simmer for a couple hours. Then let cool a bit and strain into airtight container and keep in the fridge for about a week. (use to cook grains and beans for the week) It's really that easy and these are ingredients that we usually have on hand. chopping the ingredients give you the most flavor out of them!

Nutritional info: 
These yummy balls are little nutritional power houses!!
SWEET POTATOES provide a huge punch of vitamin A, plus iron, calcium and vitamin C
LENTILS are a good source of potassium, calcium, zinc, niacin and vitamin K, and are particularly rich in dietary fiber, lean protein, folate and iron
QUINOA we all know by now as a great source of protein
NUTRITIONAL YEAST is a wonderful source of B12 vitamins

Friday, September 12, 2014

Growing up with whole foods

START THEIR RELATIONSHIP WITH WHOLE FOODS EARLY!


 (Even if it's one pot of tomatoes or basil or carrots...they'll love to taste what you've been growing!)

Even before Owen turned 1, I would take him to the garden with me and let him crawl around and explore the dirt, grass, weeds, plants... He would get super dirty and have a ball! Once the plants started to grow and produce our greens and veggies, it gave me the perfect opportunity to teach him about smells, color and taste! He loved putting all the different foods in his mouth and rolling them around in his hands.

 
Tasting fresh garden tomatoes! YUM!

Include your kids in dinner preparation! This is Owen watching me cook up some kale from our garden. Whether it's food from the garden or from the grocery store, try to include them in your plans for each item. Chances are, your kiddos are doing the grocery shopping with you, so explaining how that yellow squash is going to turn into a yummy dinner will not only teach them how to cook healthy meals, it will get them involved. Let them pick out the perfect squash! If they are involved in the process, they'll be more inclined to taste the end result!
(summer squash is a great source of antioxidants and vitamin C!)

**tip to try: If your kiddos are not crazy about the simple roasted squash (squash rounds with olive oil, garlic, salt, pepper roasted at 400* for 25-30 min) dish you made one night (although who could resist??!), talk to them about how you could prepare it next time...like breaded and baked with tomato sauce! The next squash night will be an event they'll look forward to! 

Squash breaded and baked with tomato sauce:
you'll need:
5-6 squash (yellow or zucchini both work great!)
1.5 cups whole wheat breadcrumbs (bonus points for using stale homemade bread buzzed in a food processor)
3/4 jar of your favorite tomato sauce (or make your own with recipe below)
1/4 cup nutritional yeast (mix some in with breadcrumbs and save some to sprinkle on top!
3T ground flax seed mixed with 6T water (to make flax egg mixture)

slice up squash into 1/4 inch rounds. dip in flax egg mixture and roll around in breadcrumb/nutritional yeast mixture. lay on parchment lined baking sheets and bake at 400* for about 20 min. flipping over half way through. we just want them to dry out and brown a bit. lower over temp to 350*

grease a baking dish (with veg oil spray or a tiny bit of olive oil). spread a thin layer of tomato sauce on bottom of dish, layer 1/3 squash, layer more sauce, then 1/3 squash, then sauce then last 1/3 of squash, then the rest of the sauce. SO SIMPLE!bake at 350 for another 20 min. sprinkle some nutritional yeast on top and eat!

MAKE YOUR OWN TOMATO SAUCE:
you'll need:
5-6 tomatoes diced (or 1 lg can diced tomato)
2T tomato paste
1t basil
1t parsley
1 clove garlic minced
pinch salt
pinch pepper

Throw it all in a sauce pan and simmer for at least 30 min.

Thursday, September 11, 2014

Easy Delicious Homemade Bread

If only you could smell my house right now....mmmmmmm! 
Nothing beats the smell of fresh baked bread!

You CAN make your own bread. It's not too hard and not too time consuming, I promise!! We eat sandwiches almost every day for lunch around here. Nut butter sandwiches, veggie sammys with hummus, smashed bean and greens with avocado.....sandwiches are the BEST and they are even yummier and healthier when you make them yourself from trusted, wholesome ingredients. My go-tos are Whole Wheat-Quinoa-Flax loaf and Whole Wheat-Oatmeal-Flax loaf. (I like Bob's Red Mill Whole Wheat) The quinoa loaves have protein, iron and the flax gives those great omega-3s. The Oatmeal loaves have a comforting, hearty bite and have folate, calcium, and of course those omega-3s. Bread is NOT empty carbs!! It is delicious and an easy way to pack more nutrients into the tummy's of your loved ones!!

 What you'll need: (makes 2 loaves)
5 Cups lukewarm water
4 Tablespoons of raw sugar
2 Tablespoons of salt
2 Tablespoons (or packets) of yeast
5-8 Cups of whole-wheat flour
3 cups of either Quinoa flour OR Oat flour (ground up oats)
1/2 cup ground flax-seed
1 large mixing bowl
1 large wooden spoon or spatula

  • Pour 5 cups of lukewarm water into the large bowl. Add the sugar, salt and yeast. Stir until all ingredients are dissolved.
  •  Add 5 cups of whole-wheat flour and 3 cups of Quinoa or Oat flour (depending on which type of bread you're making) into the liquid mixture. Stir together with a wooden spoon until it comes together into a ball. This is when you ditch the spoon and use your hands.
  • knead the dough for at least 10 minutes. (tip: I just knead the dough right in the mixing bowl because then there's no mess!) You'll need to add some whole wheat flour as you go until the dough is no longer sticky (when you can stick your finger into the center of the ball of dough and it comes out clean, you can stop adding flour).
  • When you're done kneading, cover the bowl with a kitchen towel and let it rest for 1 hour. Then punch it down and cover and let rest for another 45 minutes. Then punch the dough down and slice down the middle into two equal balls and plop balls into greased pans. Let rise for another 45 min. 
  • Bake at 375 for 30 min. 
 **HERE'S THE BEAUTY OF THIS BREAD: If you have to leave the house and can't be held to the 1 hour, then 45 min, then 45 min of rising for these loaves....NO WORRIES!! It happens to me all the time! I'll come back after two hours the first rise and punch it down, then let it rise for another hour or so, then pop it in the oven...it's very forgiving!! the key is to make sure it's risen in the bread pans to a height that you like when you're ready to bake...that's it!! It'll be delicious, don't be scared!! ;) **
 
Have your kids help! The more involved they are with the cooking, the more they'll learn about whole foods, and the more they'll get excited about whole foods and eat them!!

anything goes...I have one bread pan and a whole bunch of cake pans, so when I make bread use one of each. Just plop the dough in the center of the greased pan and it'll rise enough to fill it. 
**It's fun having different sized loaves because it makes for different sized sandwiches!**